Piwis ii Tester is the Next Generation of PIWIS Tester KTS520. Porsche piwis 2 can help you diagnose and program the most new and old kind of Porsche cars. Below autonumen.com sharing Piwis ii Tester for Porsche piwis 2 developer mode Setup Guide.
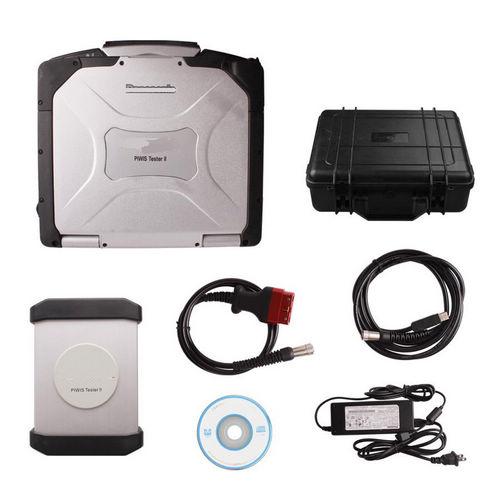
Piwis tester ii vci with V17.100 porsche piwis 2 software installed on panasonic cf-30 toughbook
Piwis ii Tester for Porsche piwis 2 developer mode Setup Guide:
NOTE 1: Please first install WinRAR and Winhex on your computer. Then to do setup as follows. Locate the file: C:\Program Files\Porsche\PIDT_P_MIG_DLSS3\pidt\plugins\de.dsa.pidt.datatype.jar
and copy it on your desktop in order to modify it.2. Open it with WinRAR, and then in the WinRAR
windows locate the file: \de\dsa\pidt\datatypes\utils\Helper$1.class and drag it on your desktop, then delete it from the
archive after the copy, and keep the WinRAR window open. 3. Open Helper$1.class on your desktop with Winhex and go to offset E81, replace 9A by A7 and
save. 4. Drag back the save file on the WinRAR window still open and click OK. Now Close WinRAR. 5. Copy the new file de.dsa.pidt.datatype.jar you just made in C:\Program Files\Porsche
\PIDT_P_MIG_DLSS3\pidt\plugins, and overwrite it. 6. Copy the file aftersales.sig on your desktop and rename it development.sig Copy this file back
in the folder. Aftersale.sig is located in C:\Program Files\Porsche\PIDT_P_DLS3\Pidt\workspace and in C:\Program Files\Porsche\PIDT_P_MIG_DLS3\Pidt\workspace 7. Do exactly the same method given above with the folder C:\Program Files\Porsche\PIDT_P_DLSS3 with its own files. To transform it in developer: Settings > Diagnostic configuration > 981-991 > mode > operating mode E= development, P= production, V= aftersales (Regular PIWIS II) Other models line > mode > operating mode E= development, P= production, V= aftersales (Regular PIWIS II) E= Entwickler, P= Produktion, V= Verkauf (Standarteinstellung PIWIS II)
NOTE 2: The Development Mode DIY guide here is a customer solution; obd365 has not tested yet and
you may be at risks to have a try. Good luck.
What can you do with obd2tuning.com Porsche Piwis Development Mode?
1.start/stop”LAST MODE”wait for stopping the engine and change memory 2.spoiler”lessen time when the car starts 3.spoiler”fixed” 4.spoiler”change angle” 5.Change VO code 6.Close Air Mercury 7.Upgrade power 8.Remove the tire pressure sensor 9.Install reversing camera 10.Install USB/BT 11.Close the seat belt warning 12.Change CDR/PCM operation interface 13.Air condition memorization 14.Start CDR_AUX 15.Open the PCM function 16.Manually set codes 17.Automatically set codes 18.Manually do programming 19.Automatically do programming
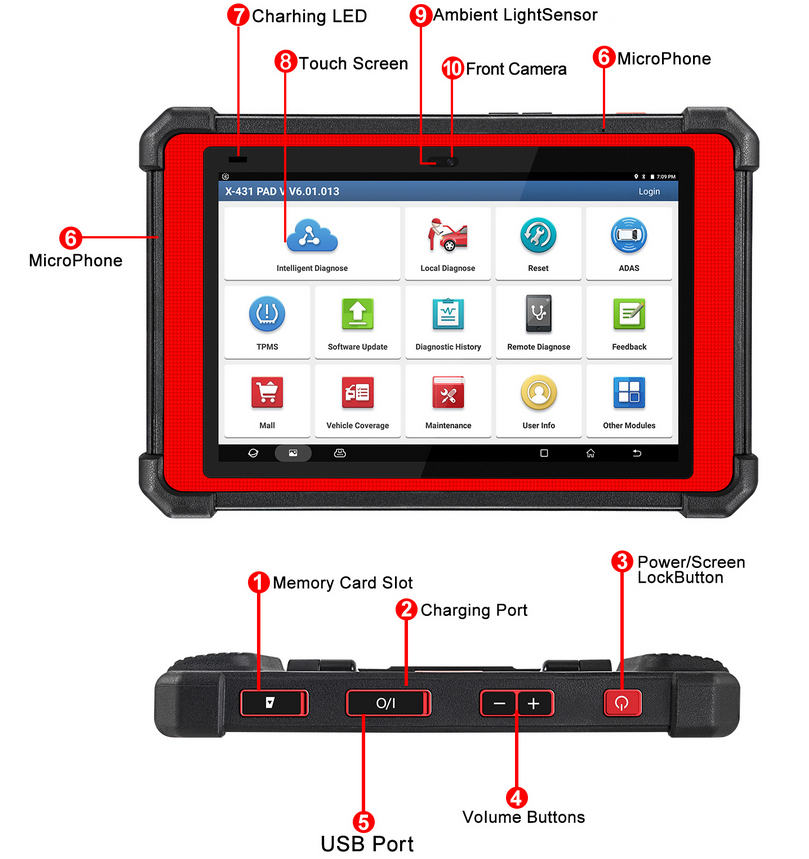
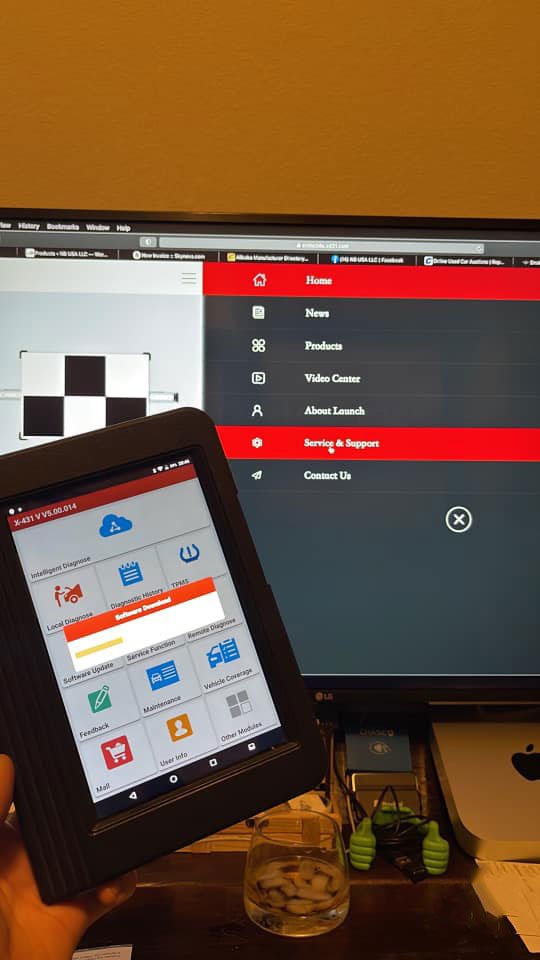
A diagnostic tool and software has all years. Launch X431 PAD V auto scan tool new-added topology module mapping, it is easy to view the communication structure between modules. You can directly access all system to perform functions and view live data in graph. Launch X-431 PAD V is Launch’s latest top-end car comprehensive diagnostic scan tool supporting programming and coding. It inherits Launch’s many advantages in car fault diagnostic technologies, including large car model coverage, powerful functions, a large number of special functions, and accurate test data. you can perform high level diagnosis and pro-gramming for more accurate diagnosis and efficient car repair jobs to win more business.
Launch X431 PAD V 5 SmartBox:
Why need to Choose it ? 1. Launch X431 PAD v is with Smartbox V3.0 diagnose connector, it supports All diagnostic protocols: J2534 protocol + D-PDU protocol + RP1210 protocol + CANFD+DOIP protocol X431 PAD V Support PEV ( pure electric vehicle ), other launch x431 device supports Hybrid cars , but do not support PEV 3. Online programming( more safety during programming, even though you failed during programming , x431 pad v can allow you program again, will not break the ECU ) 4. Faster Speed , Best Hardware , supports works under the sun 5. X431 PAD V is with 10.1 inch IPD Touch Screen ,it can work under the sun( you can se the screen clear under the sun ), launch x431 other products can not work under the sun 6. X431 PAD V is with Type C connector . 7. ADAS Calibration Function +TPMS Diagnostic Function 8.With topological diagram Function 9.Guided Functions for VW and for Audi Brands 10.OBD2 Procotol 16pin connector pin detection Function ( Only X431 PAD V has the function ) Intelligent Diagnose Remote Diagnosis: Device-To-Device & Device-To-PC). 13. Global version , No IP limited , 1 year free update 14. Diagnostic history and diagnostic feedback 15. Extended Modules (need buy them on mall )
What’s the Advantages of X-431 Pad V?
It has a charging base, front /rear camera, NON-OBD connectors and a large 10.1-inch touch screen. Its battery is Lithium to work for more than 8 hours intensively, and includes a 180 adjustable handle on the back with 3 positions to hang, use as a steering wheel support and transport standard. The PADV is manufactured with degree of protection IP65 , which protects it from splashes, bumps and dust.
PAD V is capable of diagnosing passenger cars, commercial vehicles and industrial vehicles (12 and 24 V) and is compatible with DOIP communication protocols , new CAN networks FD and J2534 and ISO22900 (Pass Thru) , with the latter you can connect to the manufacturer’s website and make programming among many other functions. It also includes the SW for vehicles with Advanced Driving Assistance System (ADAS) and is compatible with the static calibration accessory X-431 ADAS Pro .
You can attach different optional accessories such as a 4-channel oscilloscope, battery tester, endoscope and sensor simulator. Its Internet connectivity is total to offer an infinite number of services, such as the sending of technical bulletins, tele-diagnosis, online technical information (Data LAUNCH), automatic updates and the possibility of communicating with other LAUNCH equipment for the help between workshops (cooperation remote). Compatible with golo telematic devices.
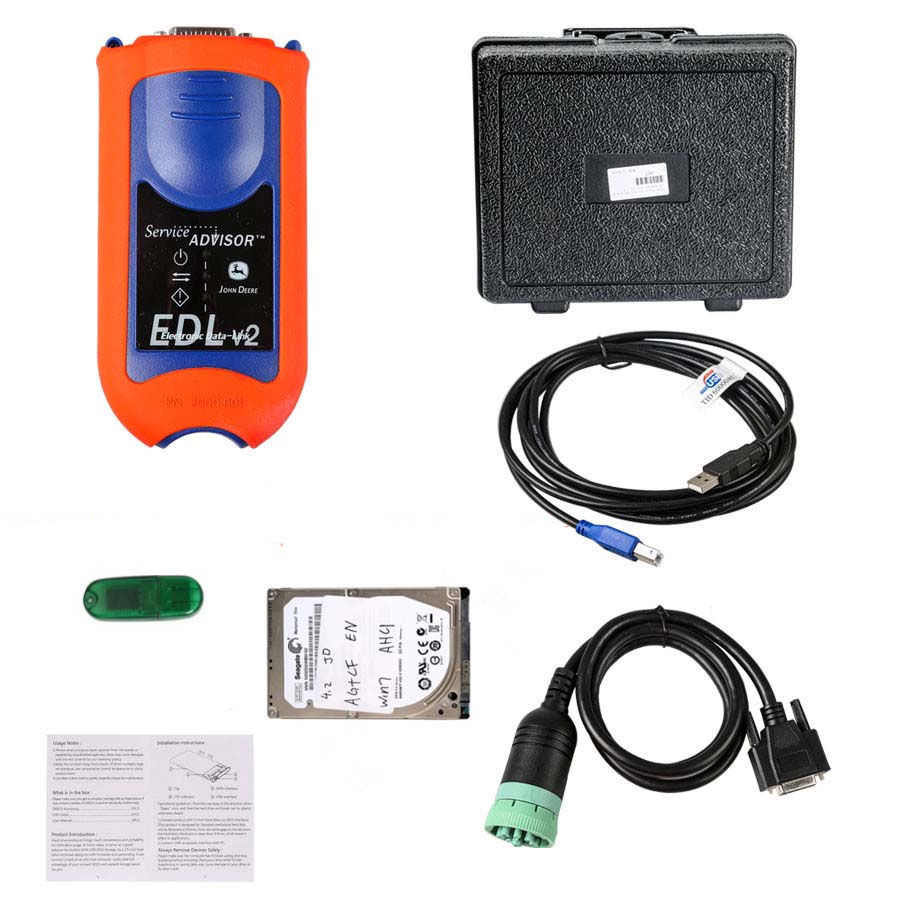
Please select the correct version which you need before make the order 1. With John Deere Service Advisor V5.2 AG Supports vehicles to 2018 2. With John Deere Service Advisor V5.2 CF Supports vehicles to 2018 3. With John Deere Service Advisor V5.2 CCE Supports vehicles to 2018
We will install the selected software in the lenovo T410 laptop, you can use it directly after receiving the package. Operating System: Windows XP 32 bit, Windows 7 32 bit, Windows 7 64 bit, Windows 8/8.1 32 bit, Windows 8/8.1 64 bit, Windows 10 32 bit, Windows 10 64 bit
Multi-language available: English, French, Italian, Spanish, Portuguese Note: HDD comes in English in default. If you need other language, please contact our customer service before ordering.
John Deere Service Advisor EDL (Electronic Data Link) heavy duty diagnostic adapter for construction equipment, agriculture, engines John Deere.
Notice: If you want to do 3038E truck, then need to use V5.2 software (Hardisk Version).
With John Deere PLD File Encryptor/Decryptor you can:
-Decrypt PayLoad (PLD) file to txt/ini format
-Modify PLD file expiration
-Modify PLD factory options such as speed limit (for example change 40 km/h to 50 km/h)
-Adjust PLD file to different product serial
-Encrypt PLD file
-Program controller with modified PLD using Service Advisor
-Support Windows XP
How to change speed limit with pld files?
Q1:
Question about payload files:
I have pld files of my tractor (6330P) 11 in total.
I see in bottom of each files info about my tractor (option, serial number etc)
Question: My goal is up the speed limit from 40km to 50 km. I think I have to change OPTION=3 to OPTION=5, but do I have to edit each 11 pld file?
A1:
You were right about the speed limit:
you can change OPTION=3 to OPTION=4 or any other you need.
Speed_30kmh = 1;
Speed_35kmh = 2;
Speed_40kmh = 3;
Speed_50kmh = 4;
Speed_ECO = 5;
Speed_NoiseRed_OOS = 6;
For R models the line is different. ROADSPEEDLIMIT=3 change to ROADSPEEDLIMIT=5 or any other you need.
var RoadSpeedLimit_30 = “1”;
var RoadSpeedLimit_35 = “2”;
var RoadSpeedLimit_3840 = “3”;
var RoadSpeedLimit_40E = “4”;
var RoadSpeedLimit_50 = “5”;
var RoadSpeedLimit_50E = “6”;
var RoadSpeedLimit_55 = “7”;
var RoadSpeedLimit_60 = “8”;
var RoadSpeedLimit_60E = “9”;
After you change it, sometimes you still need to lift the speed manually through the display (depending on the tractor model)
You only need to reprogram transmission controller for that.
If you reprogrammed all of them, some settings might have went to default so you might get up to 5 fault codes that you need to configure with SA.
Q2:
Does it work with SA 4.2?
A2:
Service Advisor is just a tool to use pld. Pld editor works without SA.
Q3:
I have a question about trying to up the power of a 6330 to a 6430. If I compare the engine pld of both tractor they are identical (just the info in the bottom is different) So I don’t know how it could up the power if all the code is the same??
A3:
most pld files are made for various models, the info at the bottom determines which part of the pld file will be used for programming. For example:
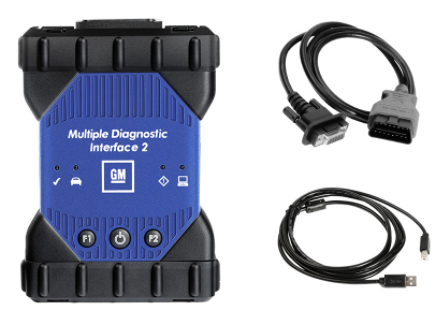
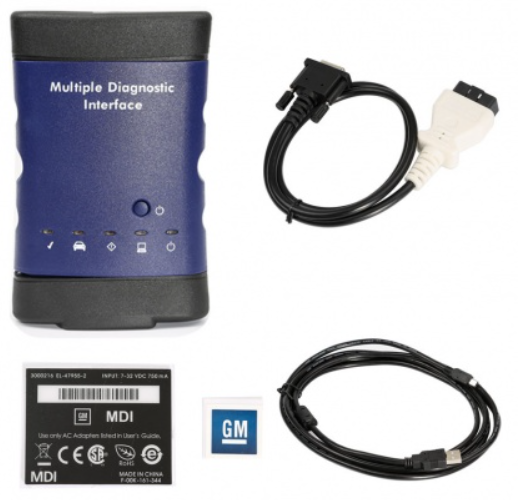
GM MDI 2 and GM MDI: This newest release GM factory scan tool begins it’s coverage in model year 2010. MDI when combined with the Global Diagnostic System 2 (GDS2) software application allows servicing of GM’s new Global Architecure Platform (Global A) vehicles. Model coverage currently includes 2010-2013 Buick LaCrosse, 2010-2013 Cadillac SRX, 2010-2013 Chevrolet Camaro, 2010-2013 Equinox, 2011-2013 Chevrolet Volt, 2011-2013 Chevrolet Cruze, 2010-2013 GMC Terrain and 2011 Buick Regal. By model year 2014 virtually all GM vehicles are serviced by using the MDI/GDS application. For all other 2010-2013 GM vehicles you will need either a GM Tech-2 or the optional ‘Tech-2 Emulator’ program to achieve OEM level functionality. The ‘Tech-2 Emulator’ uses the MDI interface device as the communications interface between pc and vehicle.
The GM MDI 2 and GM MDI when coupled up with the software application ‘GDS-2’ allows your shop to be ‘dealer level’ capable on all the above listed GM cars. Scan, pull codes, graph data and have all bi-directional controls available for all vehicle systems including Powertrain, Body, Chassis and Network. This tool will also allow you to re-program controllers as long as you have internet access on the laptop your MDI/GDS application is installed on.
GM Tech 2: This is the GM factory scan tool used in all GM dealers since 1996. Model coverage includes all makes and models of GM vehicles including passenger cars, trucks and vans. Model year coverage is from 1992 to 2013. For GM vehicles prior to 1992 you will need a Tech1A or a MasterTech listed below to achieve OEM level functionality.
The GM Tech2 will allow your shop to be to ‘dealer level’ capable on all covered GM cars. Scan, pull codes, graph data and have all bi-directional controls available for all vehicle systems including Powertrain, Body, Chassis and Network. This tool will also allow you to re-program controllers with the optional TIS-2-Web program.
GM Tech2 GM Scanner Works For GM/SAAB/OPEL/SUZUKI/ISUZU/Holden
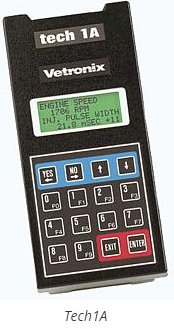
Tech1A: This was the factory scanner for all GM dealers from 1983 to 1995. It is still available, but in limited quantities. The Tech1A can be a solution for restoration speciality shops working on older GM products such as Corvettes or for the private car collector.
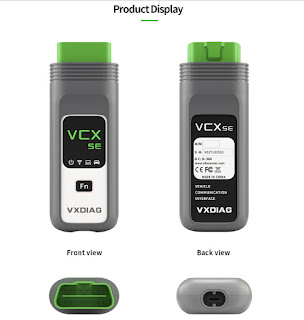
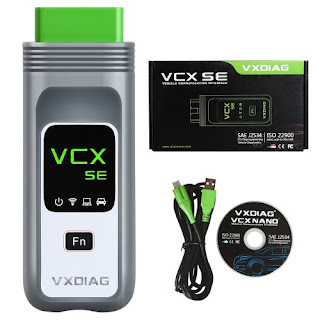
VXDIAG VCX SE for BMW Installation Guide, Coverage, Diagnostic and Programming Check Results. In general, one is worth owning.
VXDIAG VCX SE for BMW software system installation tips: The packed CD is contained with the driving force, if you have got the initial BMW software system, please run the driving force initially. If you do not have the initial BMW software system, simply run the 500GB HDD within the package, plug it into the pc and it’ll run swimmingly.
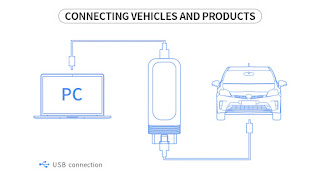
Connect VXDIAG VCX SE to the computer and BMW vehicle via Wifi & Bluetooth: 1). With the original BMW software, insert the CD to run the driver first, then run BMW software. 2). Without the original BMW software, insert the HDD to the computer to directly run without installation.
After that, you can enjoy the same capabilities as ICOM including All BMW E, F, G Series diagnosis, programming & coding, besides VCX SE features in online programming, LSAT parts drawings, brush hiding, etc.
VXDIAG VCX SE BMW coverage: From 2004 to 2019 incl. BMW Cars, For BMW Motorcycle, for Rolls-Royce, for Mini Cooper.
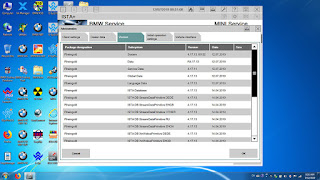
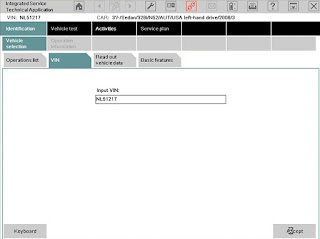
Attach several images of BMW diagnostic and programming operation: 1. ISTA -D (Diagnosis):
Input VIN.
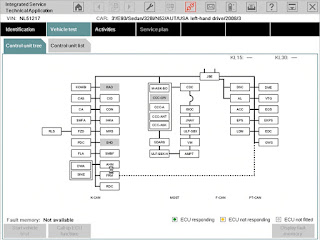
Click on “Vehicle Test”, and it directs you to Control unit tree and control unit list.
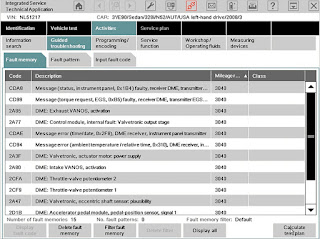
Click on “Activities” -> “Guided troubleshooting” -> “Fault memory”.
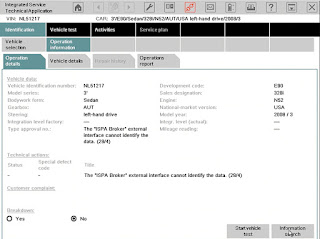
Operation information -> Operation details.
2. ISTA -P (Programming): VCX SE has many engineering software options incl. WINKFP (for E series: programming, upgrade and downgrade) Tool32 (enter key, import codes, delete certification, advanced features of For BMW series) INPA (read vehicle information, diagnosis, read and clear trouble codes) For BMW Coding (for E series: import data, change the code or realize hidden functions) KSD2 (offer full vehicle repairing information for diagnosis or programming) NCS-Expert tool (for E series: set codes, realize hidden functions and change settings).
It is worth mentioning that VCX SE has the capabilities of many programming options: – ECU upgrade programming, coding, Change vehicle configuration VO, Import vehicle FSC activation code.
-Import /Export Data Software.
– ECU version upgrade /downgrade, ECU repair after ISSS programming failure.
This is a genuine John Deere Service Advisor EDL v3 kit replacing EDL v2. The EDL3 source code is a confidential trade secret of ID SC Holdings LLC. John Deere Interface John Deere EDL v2 Interface Service Advisor preinstalled on CF-52 Tough Book Laptop Complete Diagnostic Kit.
The John Deere EDL3 was designed and manufactured for Cummins Inc. by IDSC Holdings LLC. John Deere Electronic Data Link EDL is an original dealer diagnostic PC-to-vehicle interface compatible with Service ADVISOR software. Save John Deere Service Advisor to receive email alerts and updates on your eBay feed.
This is highly explained in the John Deere Service Advisor without leaving any part. This is the John Deere Service Advisor EDL v3 Adapter. EDL V3 has improved USB connector increased memory RAM and vehicle communicat.
John Deere Service Advisor EDL Electronic Data Link V2 dealer diagnostic adapter for John Deere farm engine engines. No diagnostic software is included with this item. The edl kit also includes the V3 Wireless Adapter W1 Connector Cable DS10150 and the USB cable.
This scanner is compatible with specialize software dealer JD. EDL v3 Electronic Data Link Adapter for John Deerewith Service Advisor SA 42 software. This is the John Deere Service Advisor EDL v3 Adapter.
John Deere Service Advisor These are some of the ways in how the service manual will be helpful for you. While you select a vehicle they will provide you with the manual which. Top Rated Seller Top Rated Seller.
By signing in to this site you agree to be bound by the Terms Conditions of Use and Privacy Policy. This is the newest adapter from John Deere and it replaces the John Deere EDL v2. John Deere Electronic Data Link EDL is genuine dealer diagnostic PC-to-vehicle interface compatible with Service ADVISOR software.
The listing is for a Genuine John Deere Diagnostic Kit EDL V2 Service Advisor. All Is Ready Just Plug It In And Start Working. John Deere This is the genuine John Deere Service Advisor EDL v3 Adapter.
John Deere Service Advisor EDL V3 Electronic Data Link dealer diagnostic adapter for construction equipment agriculture engines. The second important part of Service Advisor John Deere diagnostic kit is an edl v2 adapter and cables. This is the newest adapter from John Deere and it replaces the John Deere EDL v2.
What are the the advantages of EDL V3 Data Link? Improvements on EDL v3 Improved USB connector utilizing automotive grade latching system Increased memory RAM Improved vehicle communications processor Support of multiple 500K baud rate CAN Bus recordings Longer range wireless connectivity Improved Bluetooth connection speeds utilizing Bluetooth 2.1 with EDR (J1939 compliant)
Storage Box (Part # SA5025) USB Cable (Part # SA5026) DS10150 (Part # DS10150) EDL v3 Wireless Adapter (Part # SA5022) 1 set x second-hand Lenovo T420 laptop
Lenovo T420 Laptop configuration : Brand: Lenovo Condition: Used Type: Laptop/Notebook Screen Size: 14.0 Processor Type: Intel (R) Core(TM) I5-2520M CPU Processor Speed: 2.50 GHz Processor Configuration: Dual Core Memory: 4GB Compared with other laptop, this one is better quality and run faster.
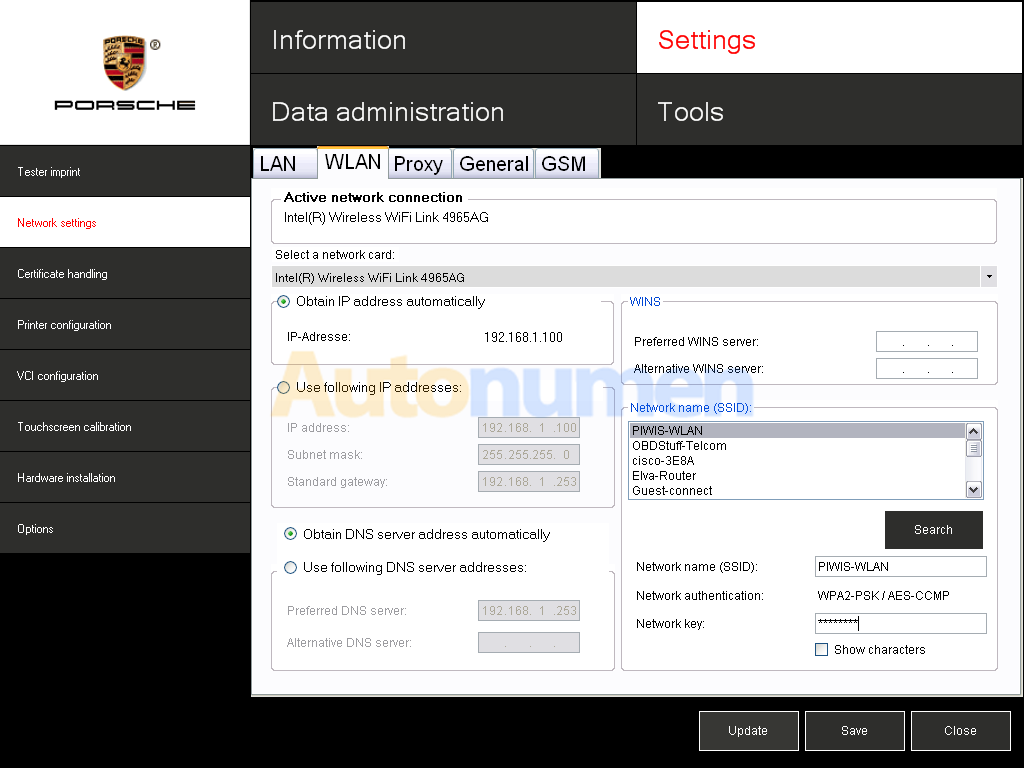
PIWIS II Wifi for Porsche OEM wireless solution released!
PIWIS II Wifi for Porsche OEM wireless solution released! The WiFi solution is 100% OEM like dealer, you can choose both USB (LAN) connection and Wireless (WLAN) function, also the WiFi signal is really strong, which means over 30 meters strong signal .
The product decprtion page please click here>>
If you want buy PIWIS II WIFI, please click here>>
For the piwis ii wifi settng, firstly you need connect the USB cable to laptop, then setting in [VCI Config] by inputing the SSID and Password of router.
A prerequisite for using wLAN is the availability of a suitable infrastructure. The workshop safety guidelines must also permit the use of radio networks. Connect the VCI to the PC using the supplied USB cable and start the VCI configuration software. This can be accessed via the relevant link in the basic software. The necessary setup steps are described separately in the section entitled wLAN configuration.
In order to establish a wLAN connection, the USB connection must be removed once configuration has been completed successfully. This is because once established, the USB connection is always active.
Tips for Configuring the piwis ii wifi Router
Only use IP addresses approved for local operation (e.g. 192.168.x.x) in the local wLAN/LAN Example: Network: 192.168.1.0, subnet mask 255.255.255.0 • Addresses that can be used: 192.168.1.1 up to 192.168.1.254 • Router address (gateway): 192.168.1.254 • Client addresses (e.g. VCI, laptop): 192.168.1.1 up to 192.168.1.100 (max. 100 participants)
Belows are setting videos for reference.
For more details, if you are interested, please contact our professional online customer service.
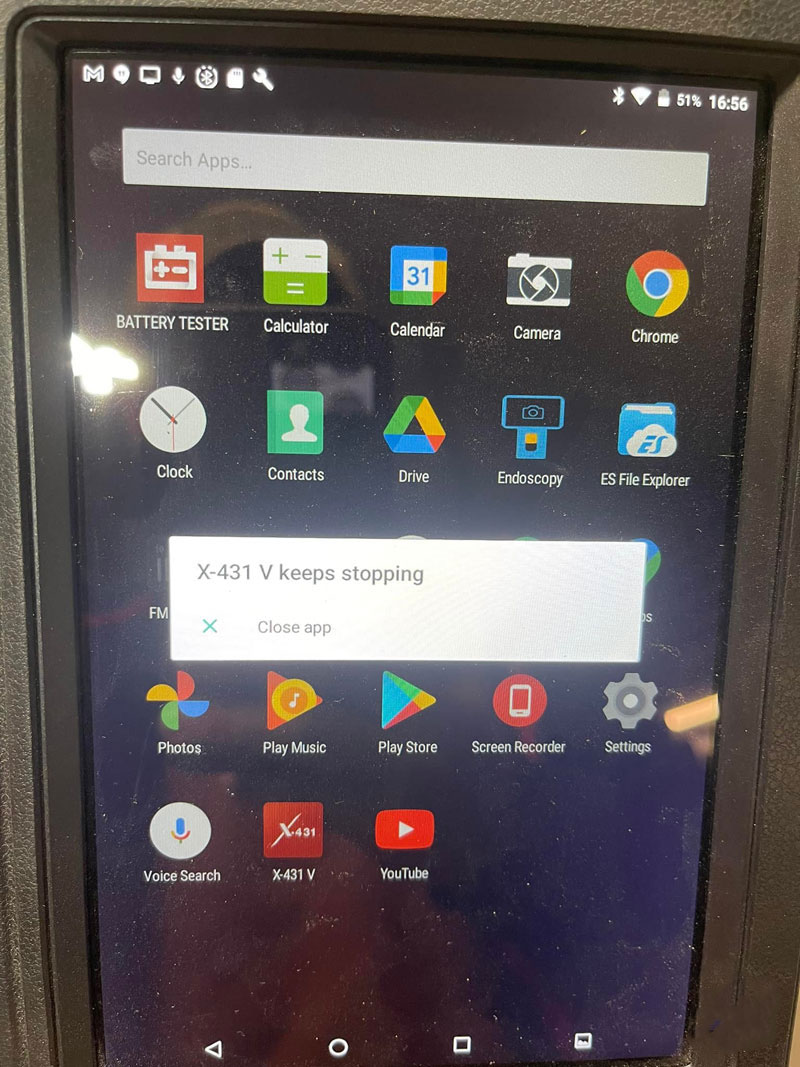
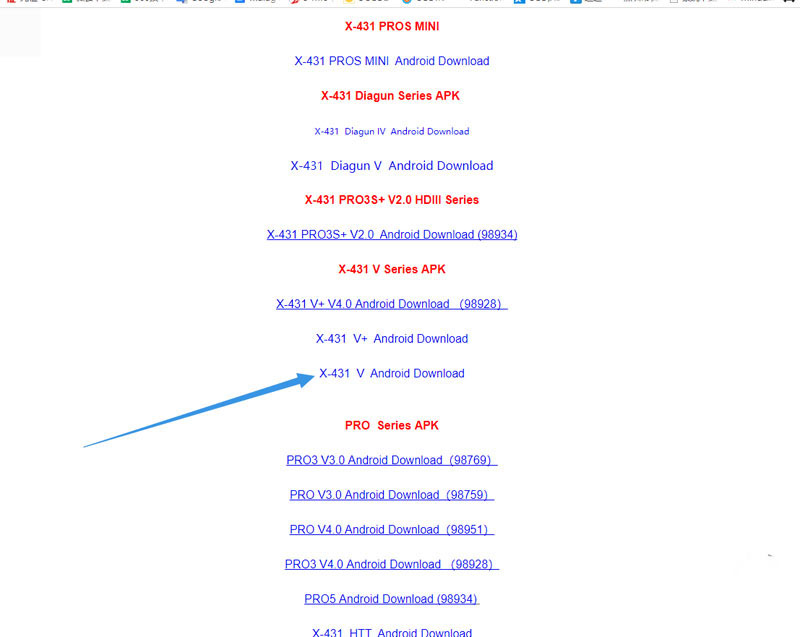
Launch X431 V 8 inch diagnostic tablet Keeps Stopping (that means I can’t open the app), and now I erase everything. please I need download the app again.
Launch X431 Solution:
Step 1. Set memory card as internal storage.
Step 2. Please redownload the app from the official website: